Blackboard Ultra LTI 1.3 Configuration Guide

Modified on Mon, 6 Jul at 8:55 AM

Blackboard Admin - Learnvia Setup Instructions

The following steps are to be performed by a Blackboard Administrator: 

Requirements

  • A developer account from the Anthology Developer Portal is required.

  • If Blackboard is installed on-premise, Learnvia Requires that Blackboard support TLSv1.3 protocol for proper LTI handshake at the course level.


Additional Notes: A separate, dynamic registration option will be provided soon. This document currently covers manual installs.


Anthology Developer Portal Setup

At https://developer.anthology.com/, start by adding a new application on the My Applications page
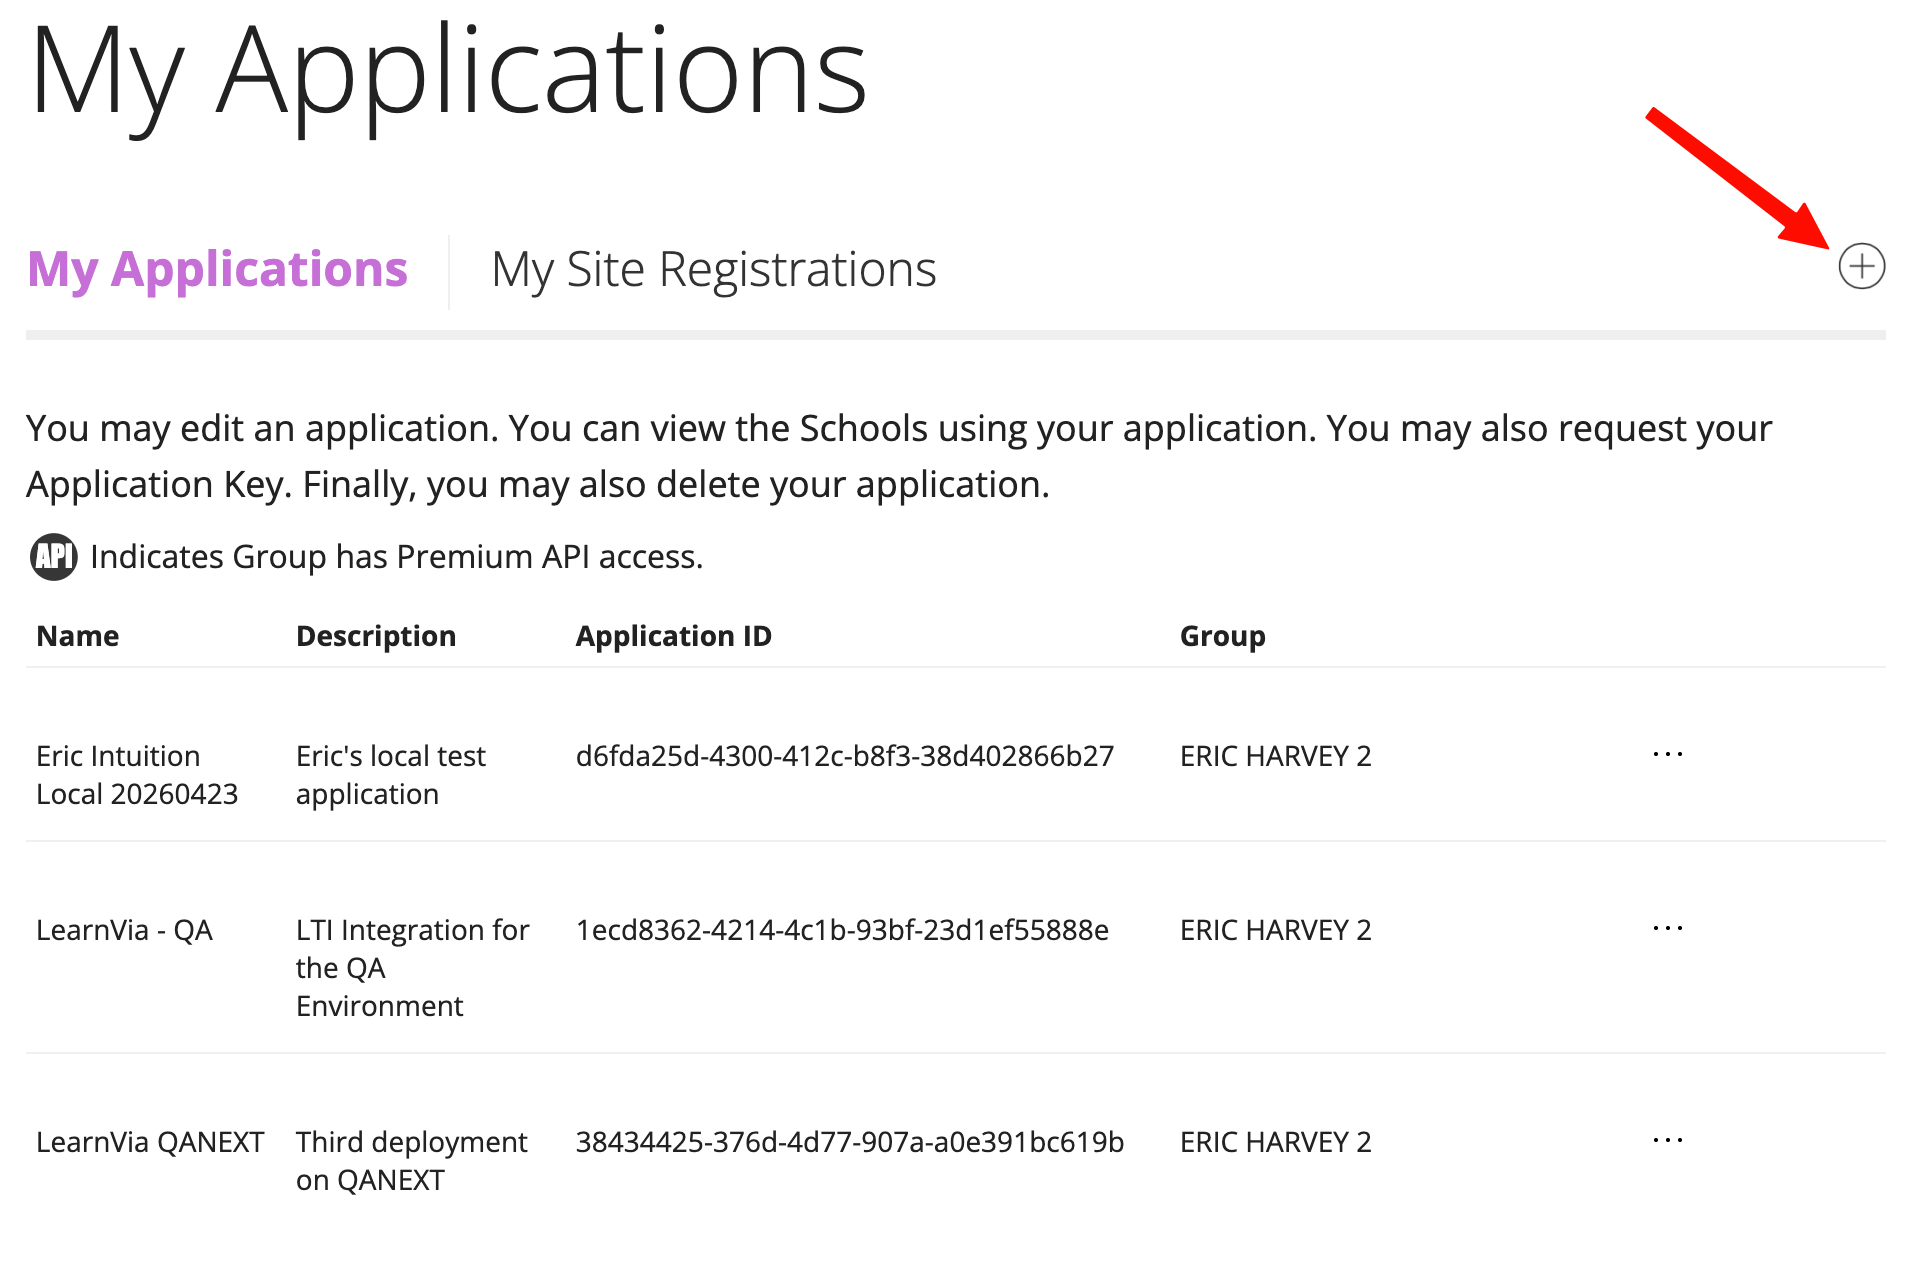
Anthology Developer Portal "My Applications" page; a red arrow points to the circled plus (+) button at top right used to add a new application.


When Registering the new application, use the following values:
Application Name: Learnvia

Description: Learnvia LTI 1.3 application integration (or choose your own)

Domain(s): courseware.learnvia.org


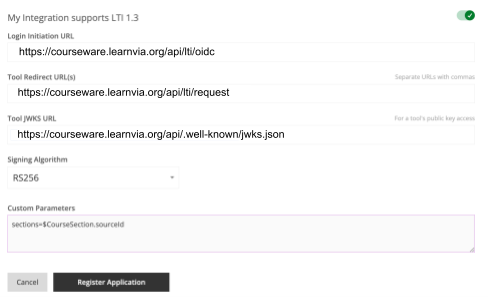
Select My Integration Supports LTI 1.3 and add the following values:

Login Initiation URL: https://courseware.learnvia.org/api/lti/oidc

Tool Redirect URL(s): https://courseware.learnvia.org/api/lti/request

Tool JWKS URL: https://courseware.learnvia.org/api/.well-known/jwks.json

Signing Algorithm: RS256

Custom Parameters: sections=$CourseSection.sourceId


Click Register Application
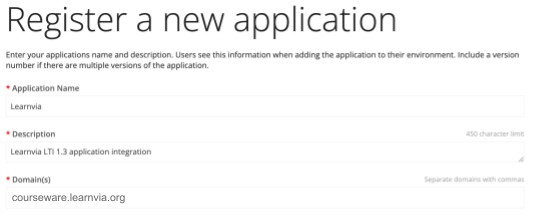
Register a new application form with Application Name "Learnvia", Description "Learnvia LTI 1.3 application integration", and Domain(s) "courseware.learnvia.org".

"My Integration supports LTI 1.3" section: Login Initiation URL https://courseware.learnvia.org/api/lti/oidc, Tool Redirect URL(s) https://courseware.learnvia.org/api/lti/request, Tool JWKS URL https://courseware.learnvia.org/api/.well-known/jwks.json, Signing Algorithm RS256, Custom Parameters sections=$CourseSection.sourceId, and a Register Application button.


On the next page, retain the Application ID and click Done.
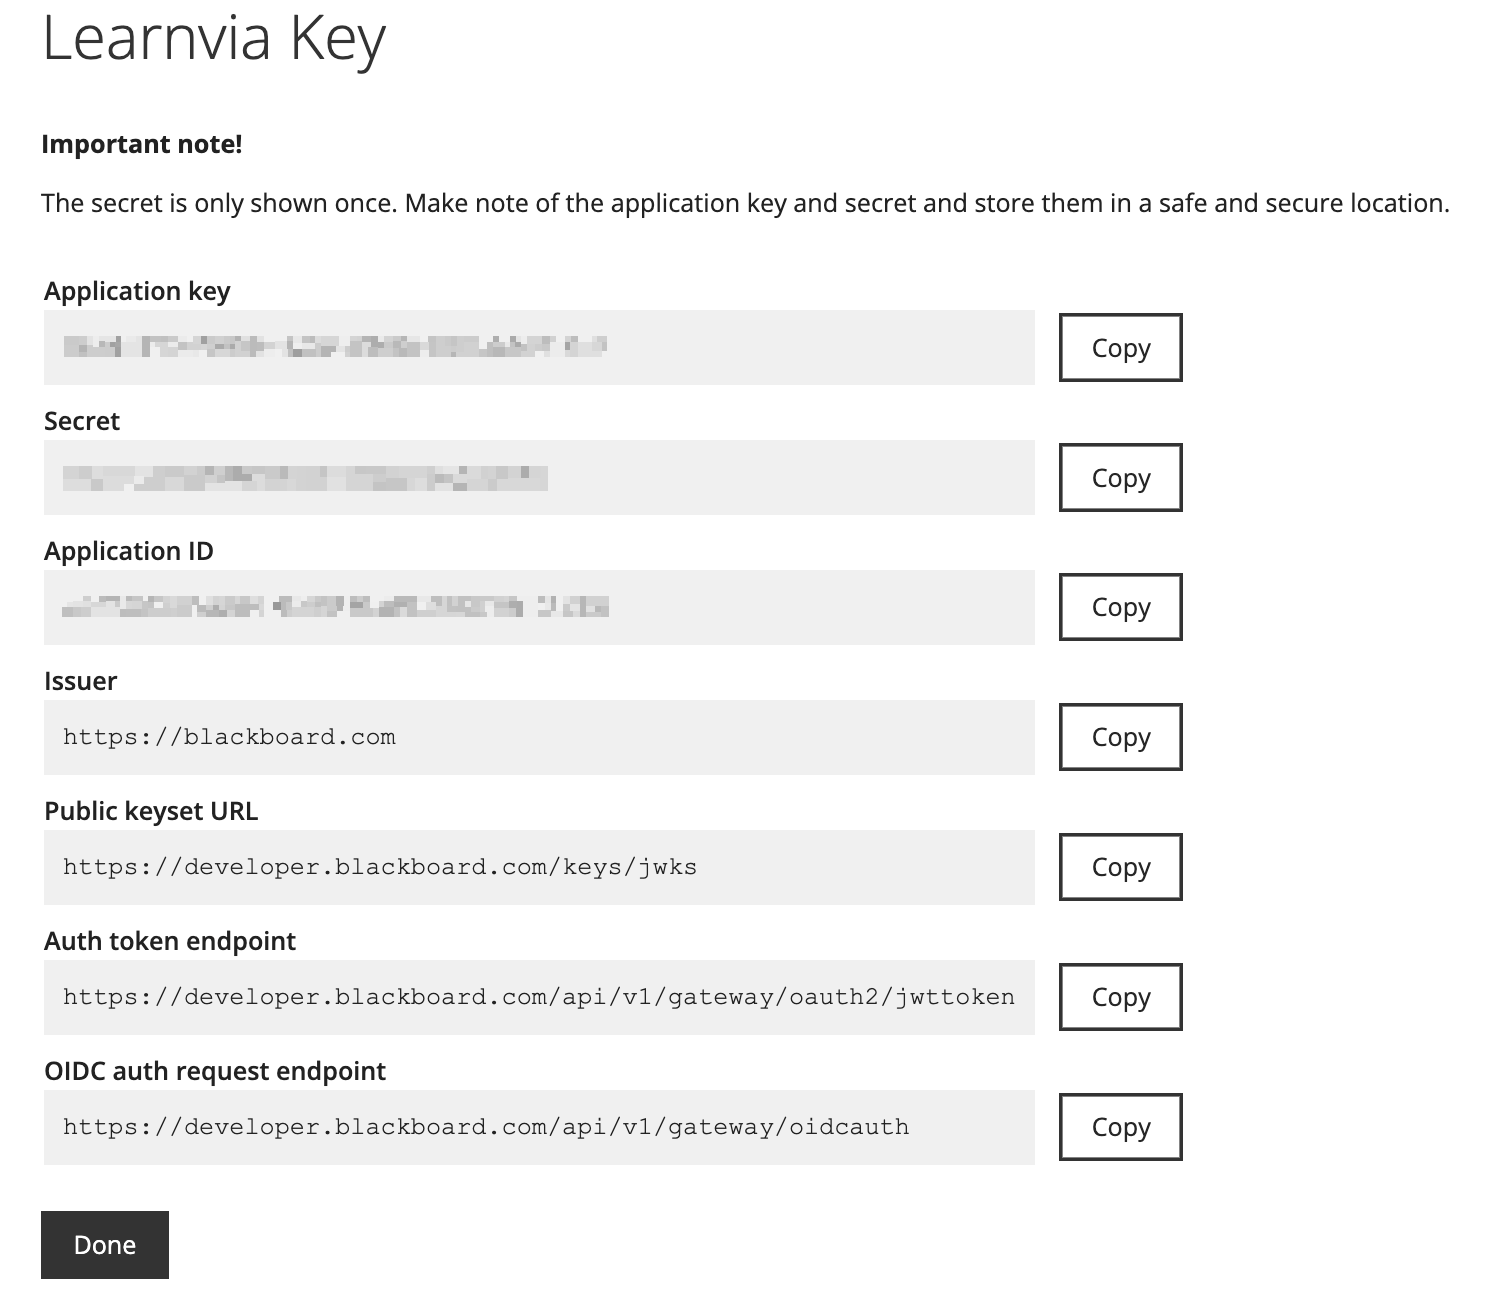
"Learnvia Key" page warning the secret is shown only once, listing Application key and Secret (redacted), Application ID, Issuer https://blackboard.com, Public keyset URL https://developer.blackboard.com/keys/jwks, Auth token endpoint https://developer.blackboard.com/api/v1/gateway/oauth2/jwttoken, and OIDC auth request endpoint https://developer.blackboard.com/api/v1/gateway/oidcauth, with a Done button.


Click the ellipsis in the newly added Learnvia application’s row and select Manage Placements from the menu
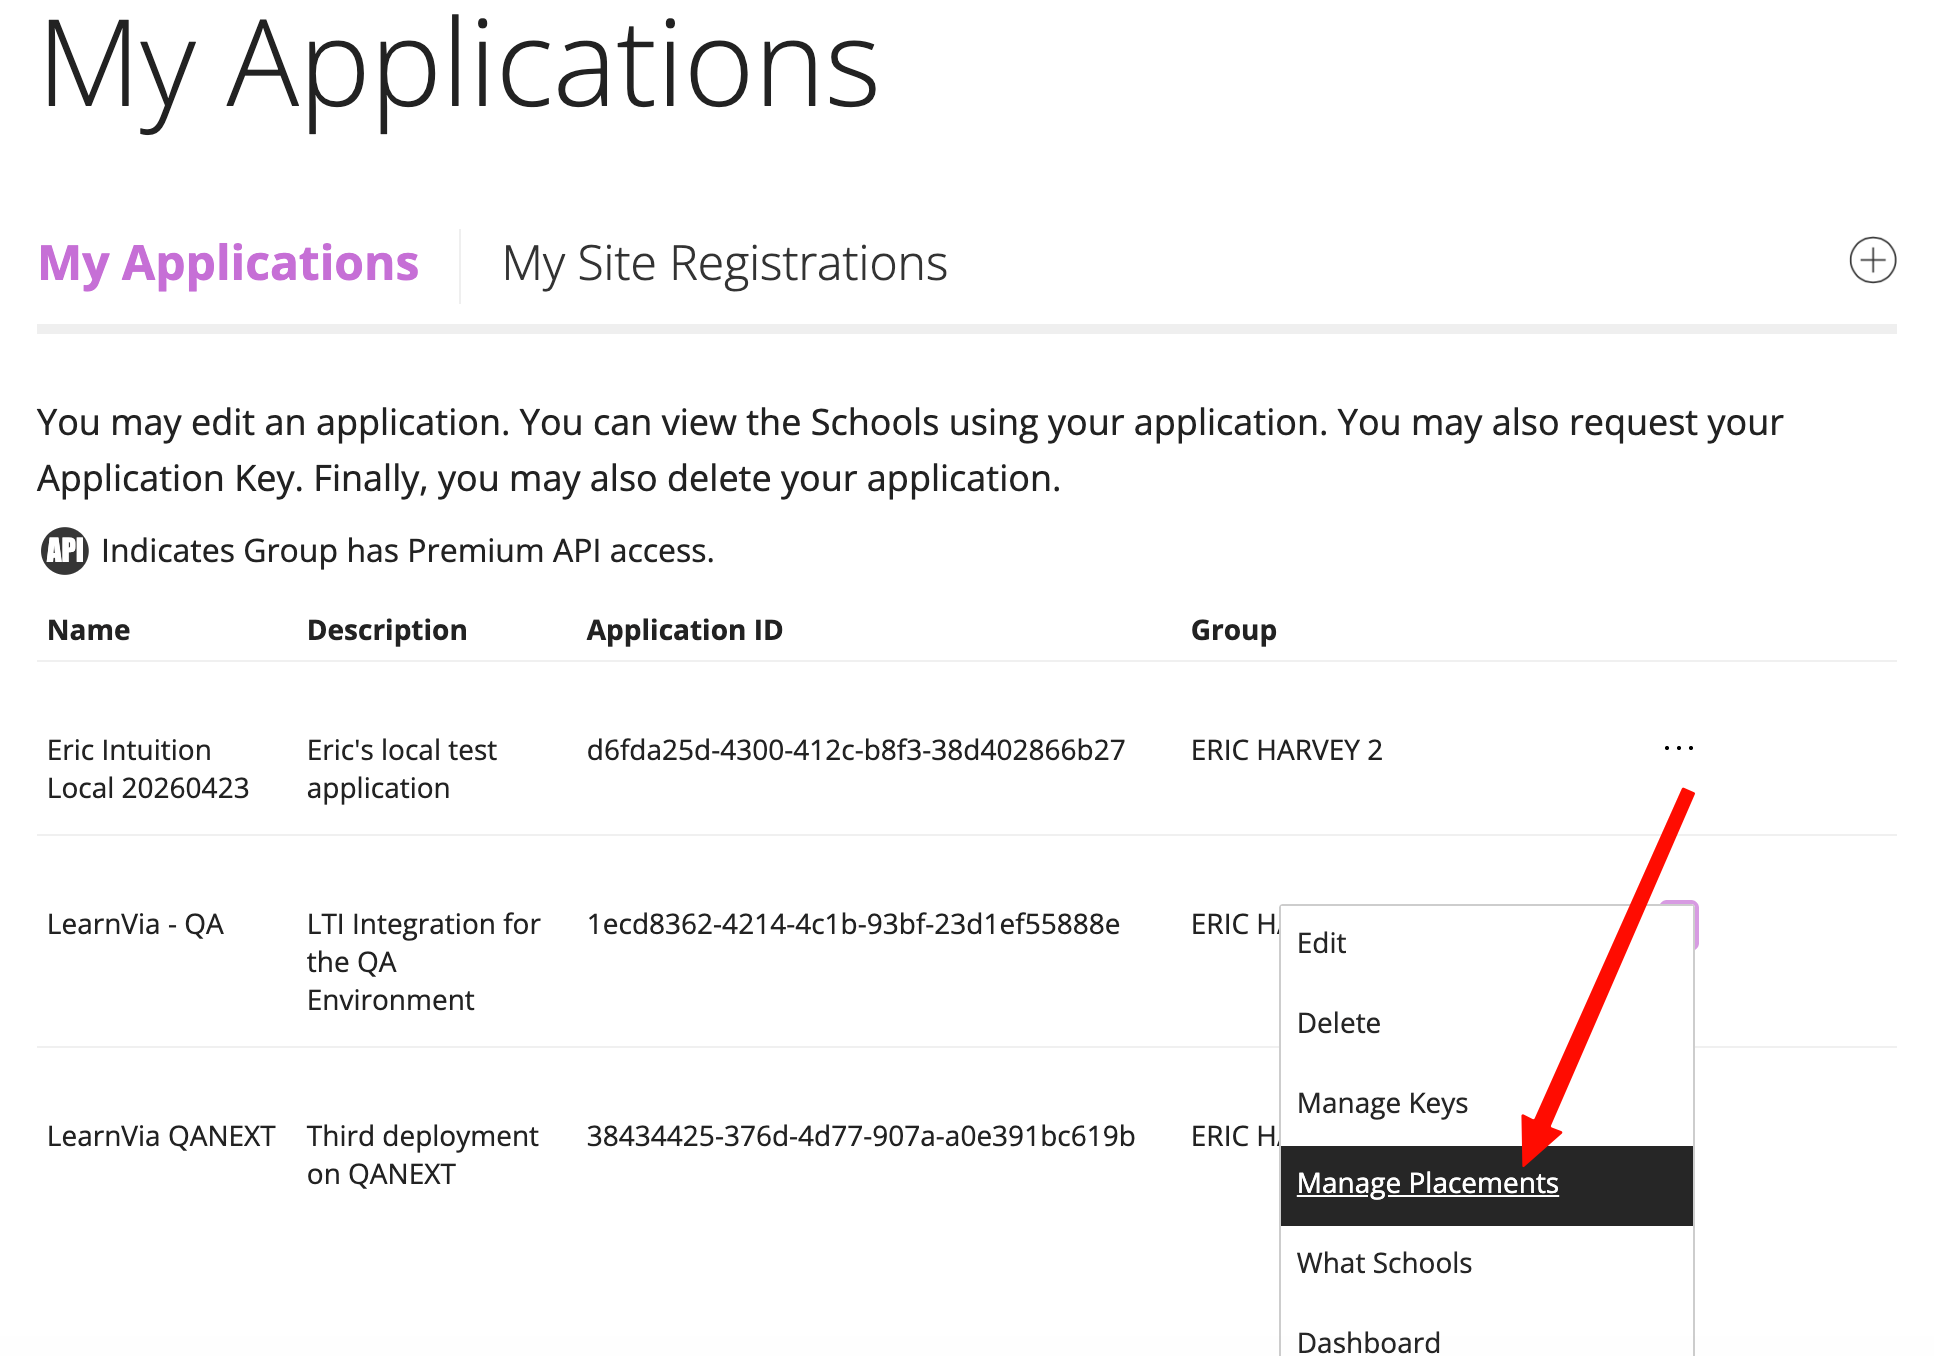

My Applications list with a red arrow pointing to the row's ellipsis menu, where "Manage Placements" is highlighted (menu also shows Edit, Delete, Manage Keys, What Schools, Dashboard).


Click Register to begin adding a new placement
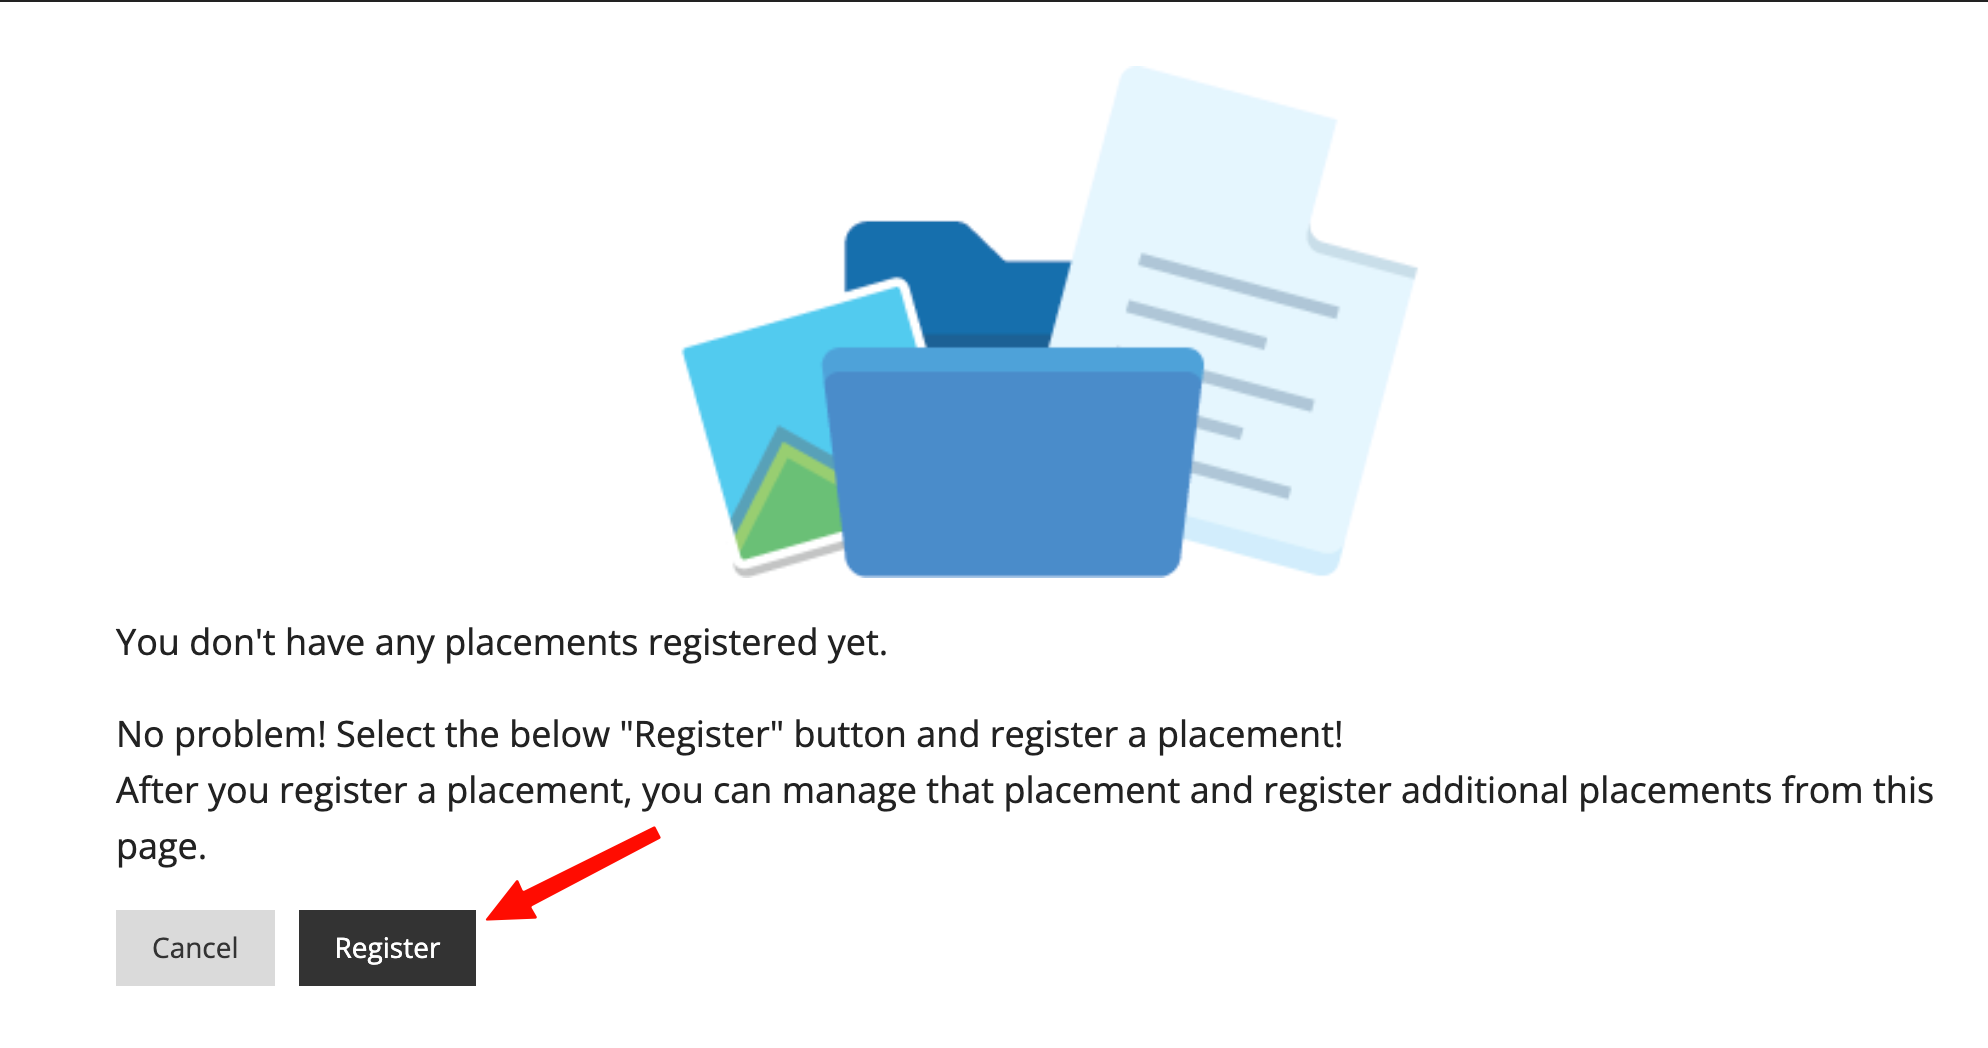
Placements page reading "You don't have any placements registered yet," with a red arrow pointing to the Register button.


Give the new placement a name: Learnvia. Select Deep Linking content tool as the “Type”, and select the options for Allow Students Access and Open in new window

Add the following links:

Target Link URI: https://courseware.learnvia.org/api/lti/request

Icon URL: https://courseware.learnvia.org/favicon.ico
Select Register Placement
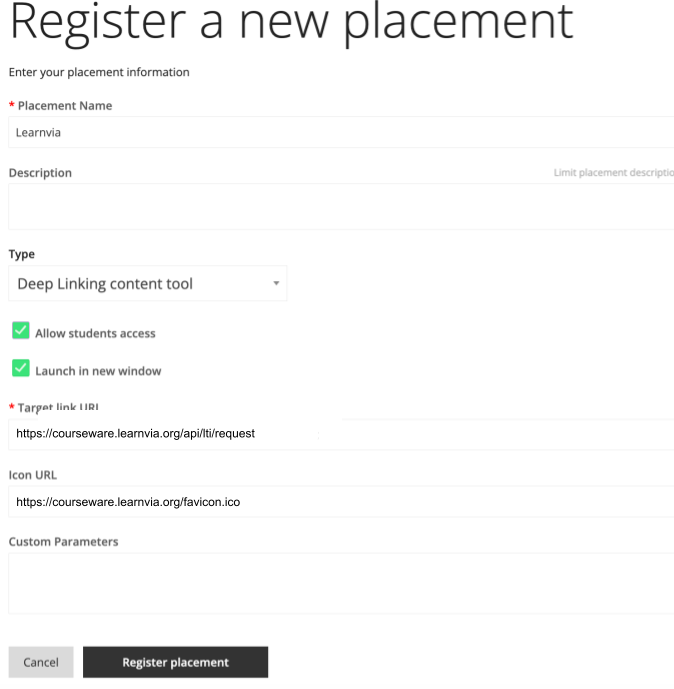
Register a new placement form: Placement Name "Learnvia", Type "Deep Linking content tool", Allow students access and Launch in new window both checked, Target link URI https://courseware.learnvia.org/api/lti/request, Icon URL https://courseware.learnvia.org/favicon.ico, and a Register placement button.


Configure Blackboard

As a Blackboard Admin, go to Admin -> Administrator Panel -> LTI Tool Providers and select Register LTI 1.3/Advantage Tool
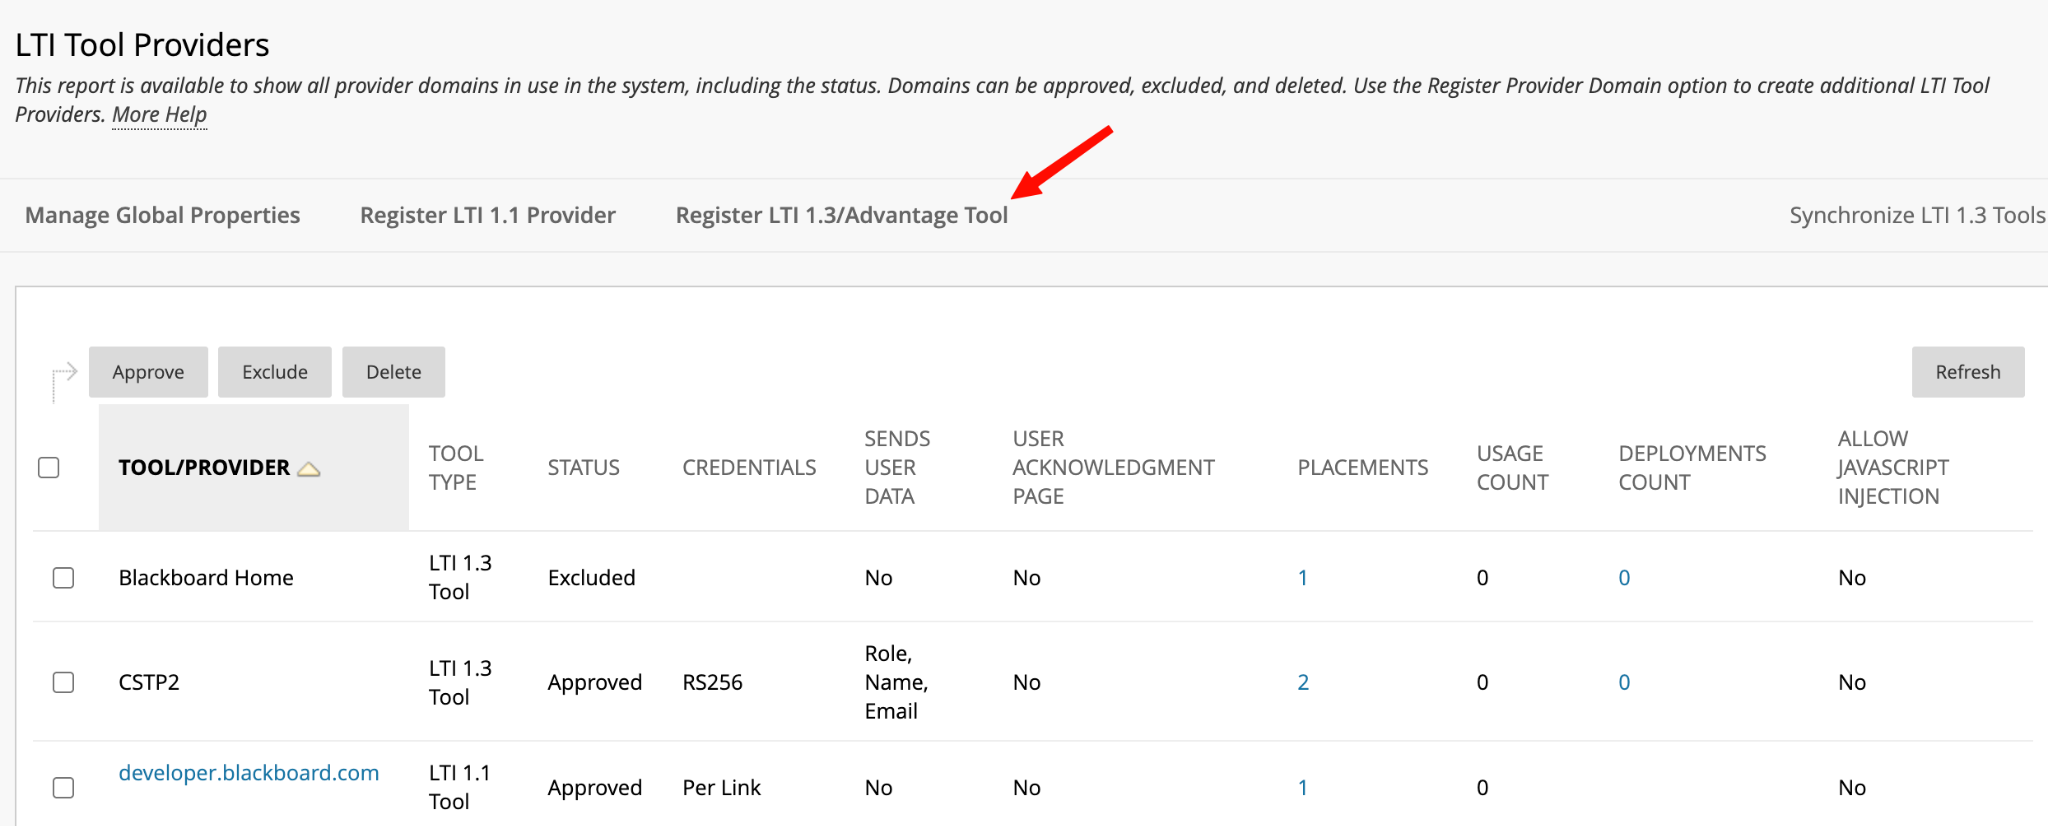
Blackboard LTI Tool Providers page; a red arrow points to the "Register LTI 1.3/Advantage Tool" link in the action bar, above a provider table listing tools with Tool Type, Status, and Credentials columns.


For Client ID, add the Application ID provided in the developer portal. Click Submit.
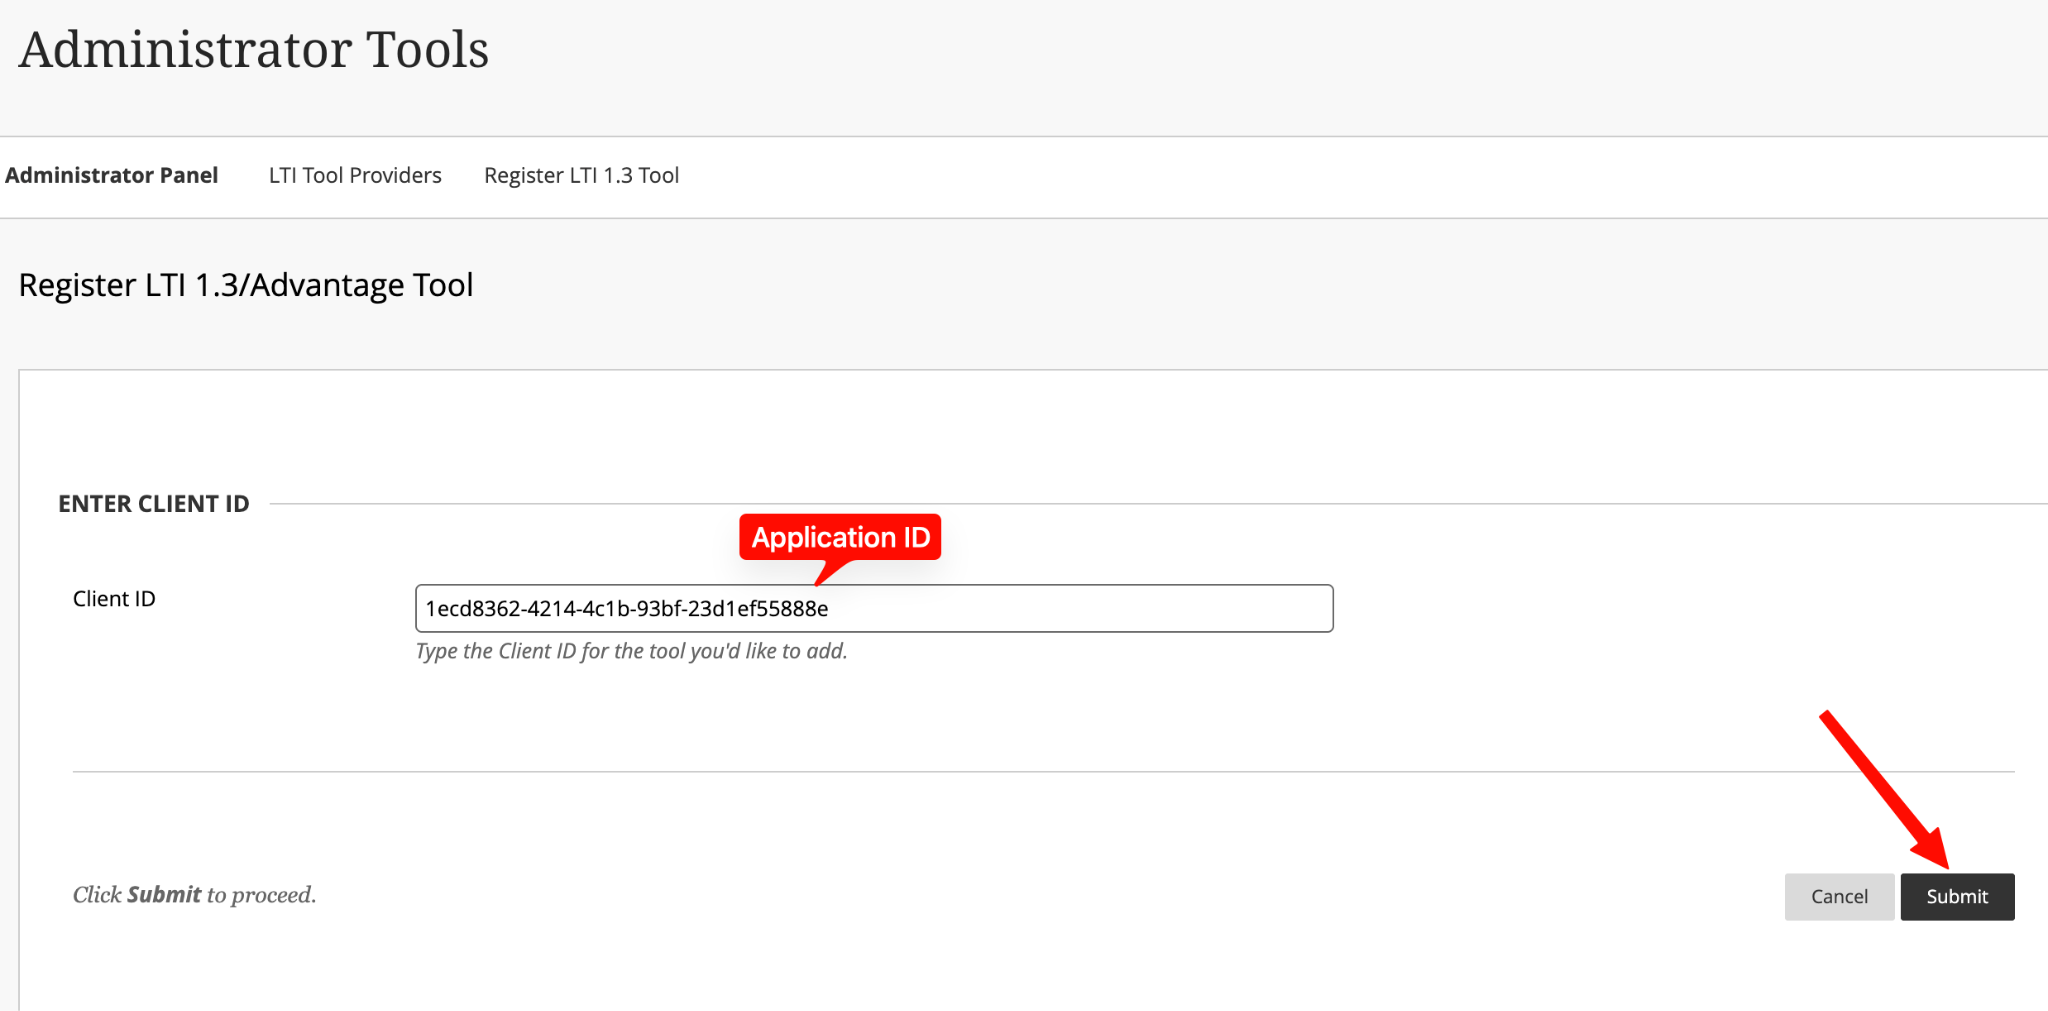
Register LTI 1.3/Advantage Tool "Enter Client ID" screen; the Client ID field contains the Application ID (labeled with a callout) and a red arrow points to the Submit button.


On the Modify/Confirmation page that follows, ensure that everything has been properly synchronized from the Anthology developer portal and ensure that the Tool Status is Approved.
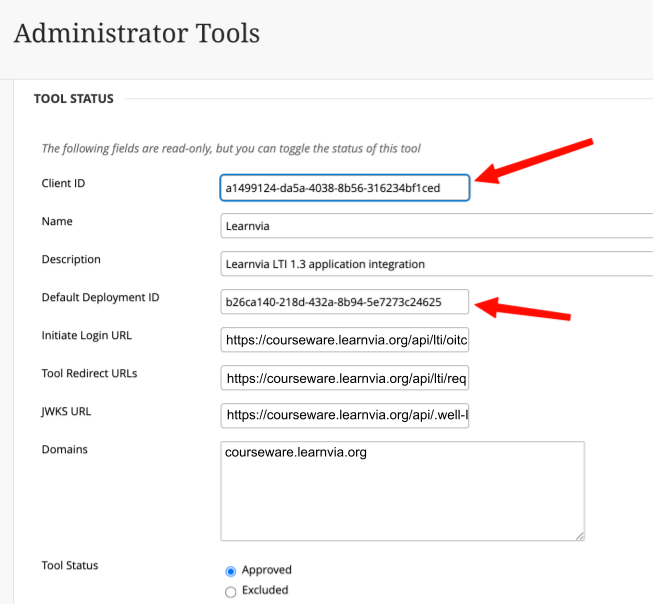
Blackboard Tool Status page (read-only) showing Client ID a1499124-da5a-4038-8b56-316234bf1ced (red arrow), Name Learnvia, Default Deployment ID b26ca140-218d-432a-8b94-5e7273c24625 (red arrow), Initiate Login/Tool Redirect/JWKS URLs and Domains on courseware.learnvia.org, with Tool Status set to Approved.

Collect the Client ID and the Default Deployment ID and send them to Learnvia support (support@learnvia.org) to complete the installation. Turn on Allow Membership Service Access and confirm that all Institution Policies are turned on. Select Submit.
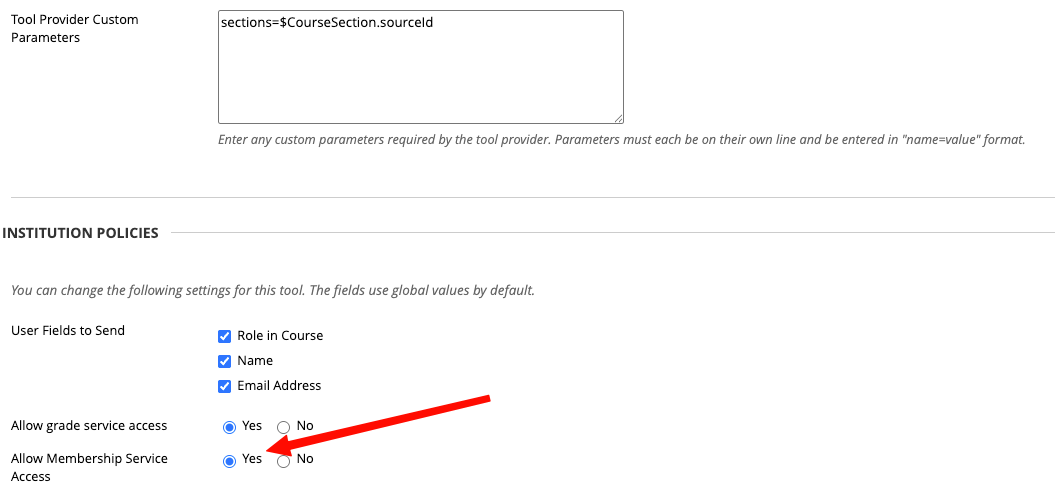
Institution Policies section: Tool Provider Custom Parameters sections=$CourseSection.sourceId; User Fields to Send has Role in Course, Name, and Email Address checked; Allow grade service access set to Yes; a red arrow points to Allow Membership Service Access set to Yes.


To confirm the placement details, click on the menu for the Learnvia Tool/Provider and select Manage Placements
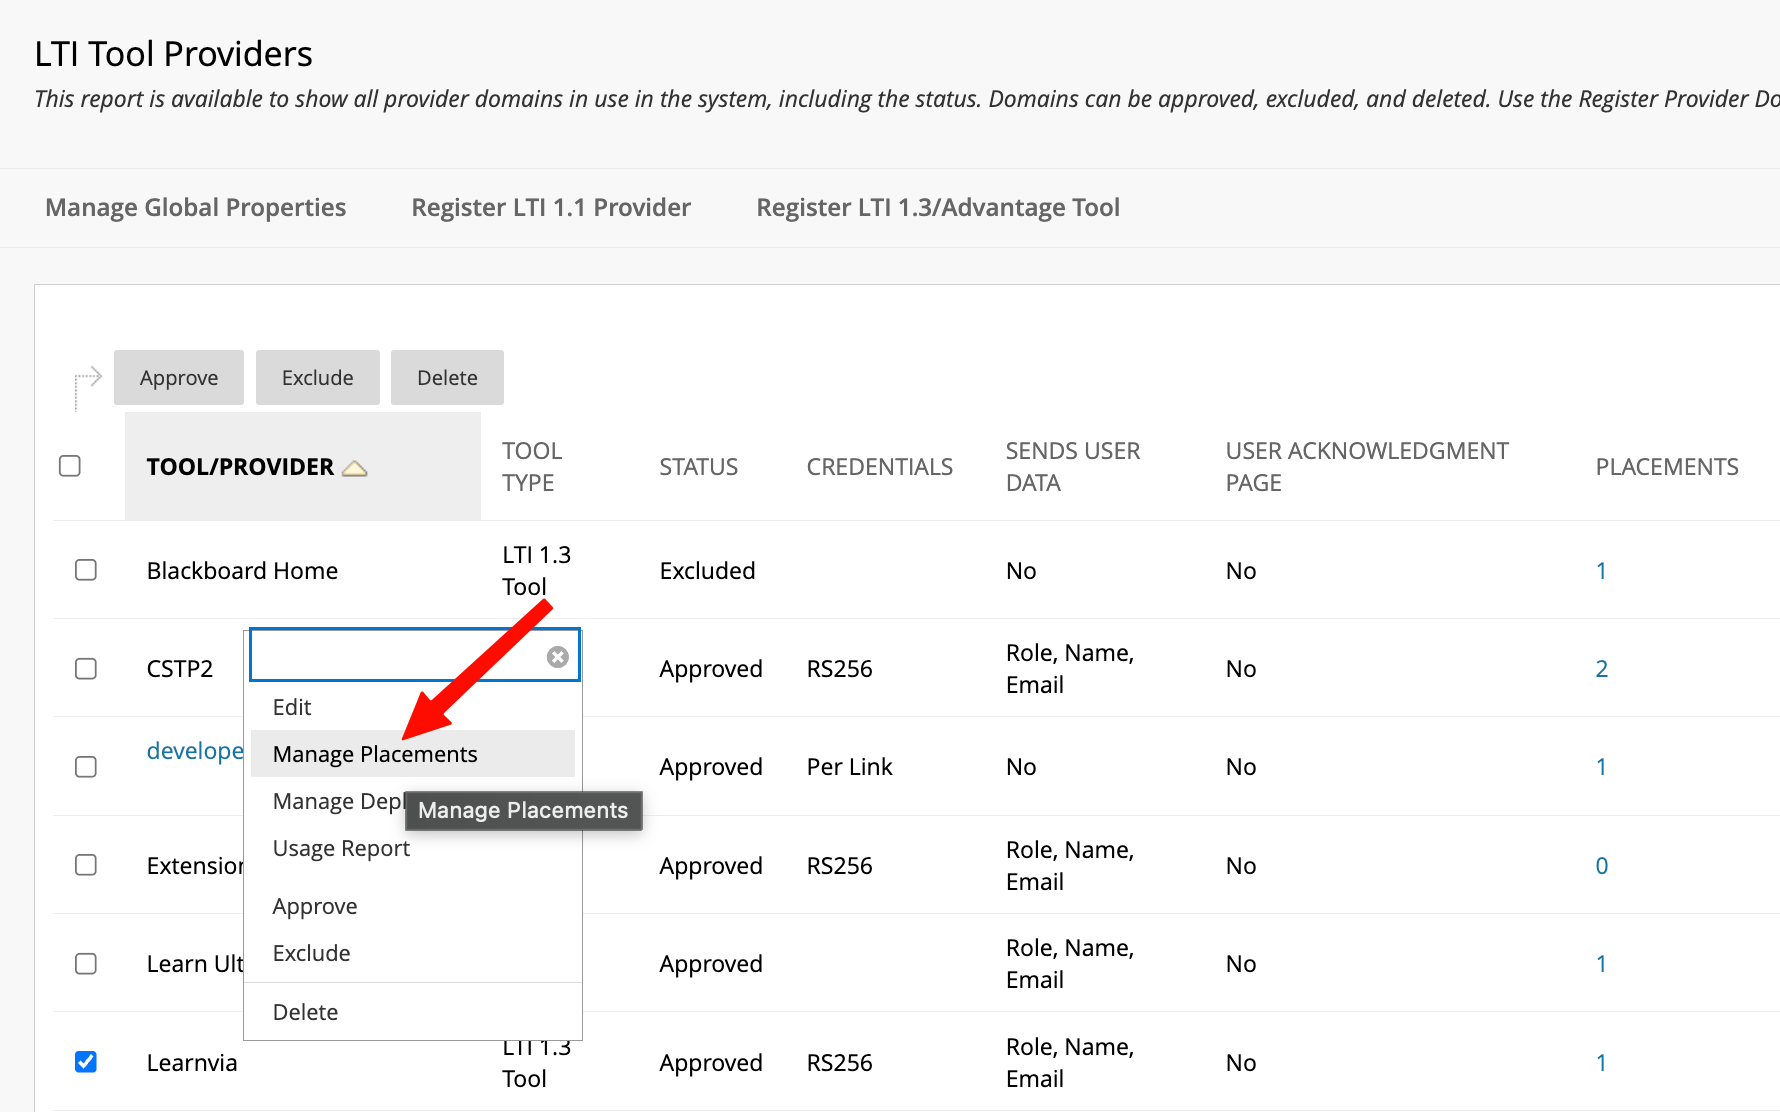
LTI Tool Providers list with the Learnvia row's menu open; a red arrow points to the highlighted "Manage Placements" option (menu also shows Edit, Manage Deployments, Usage Report, Approve, Exclude, Delete).

If a placement is not yet listed, select Synchronize Placements to retrieve it from the Anthology developer portal.
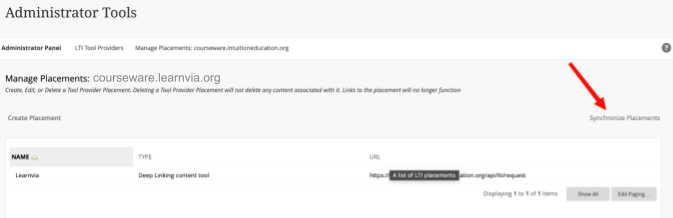
Manage Placements: courseware.learnvia.org page listing the Learnvia placement (Type: Deep Linking content tool, URL .../api/lti/request); a red arrow points to the "Synchronize Placements" link.


Add the Learnvia placement to a course (Ultra Course View) 
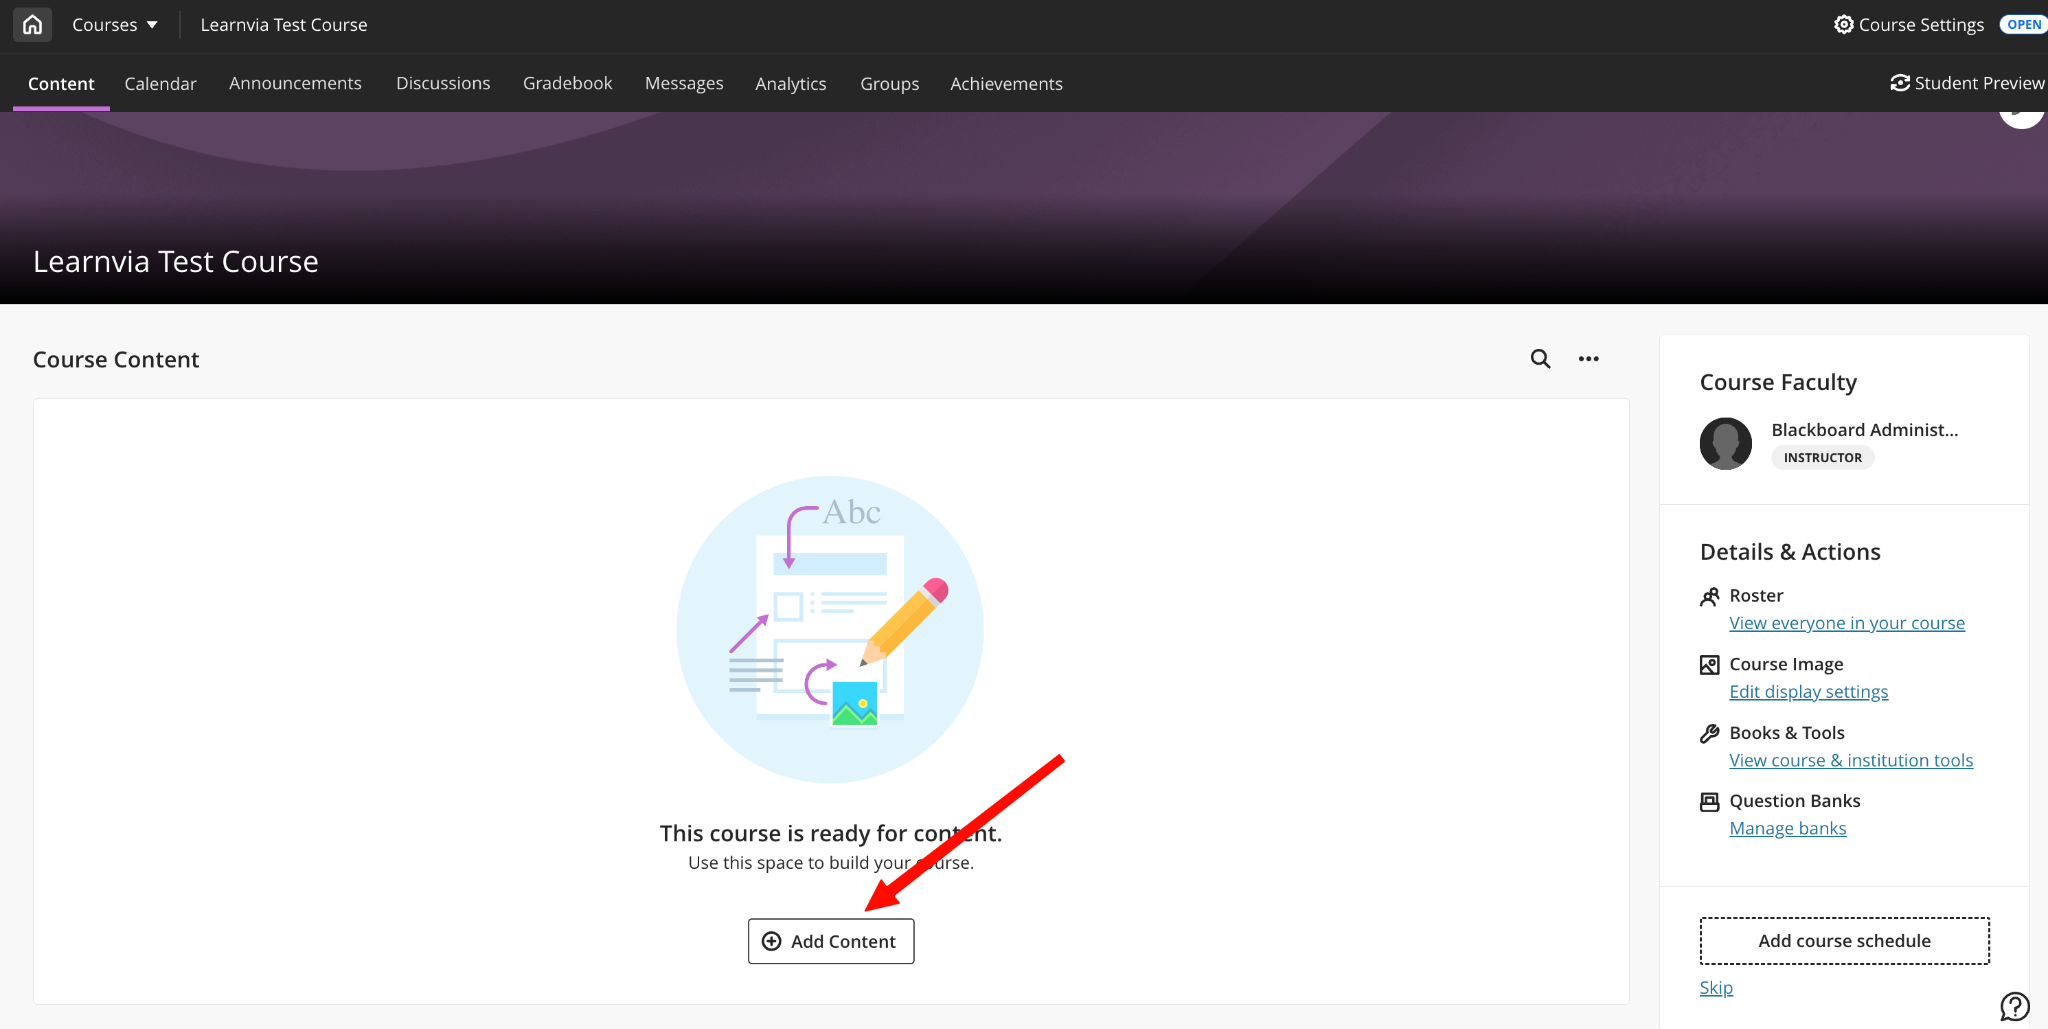
Blackboard Ultra "Learnvia Test Course" Content page; the empty "This course is ready for content" state with a red arrow pointing to the "+ Add Content" button.

Click +Add Content from the course landing page


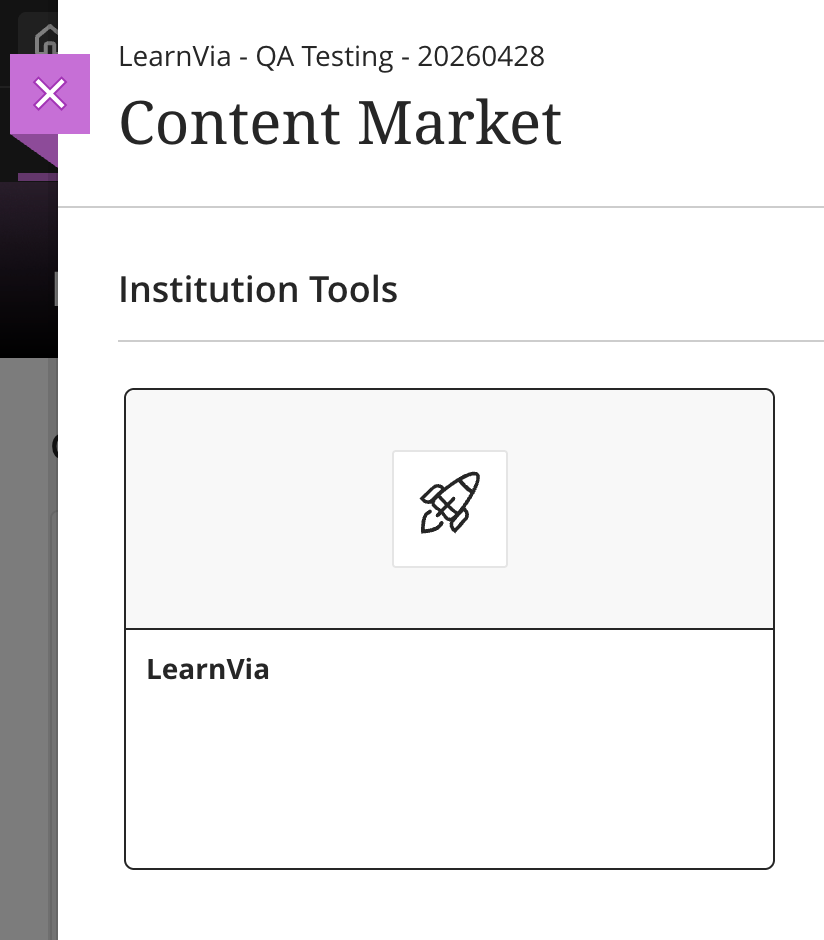
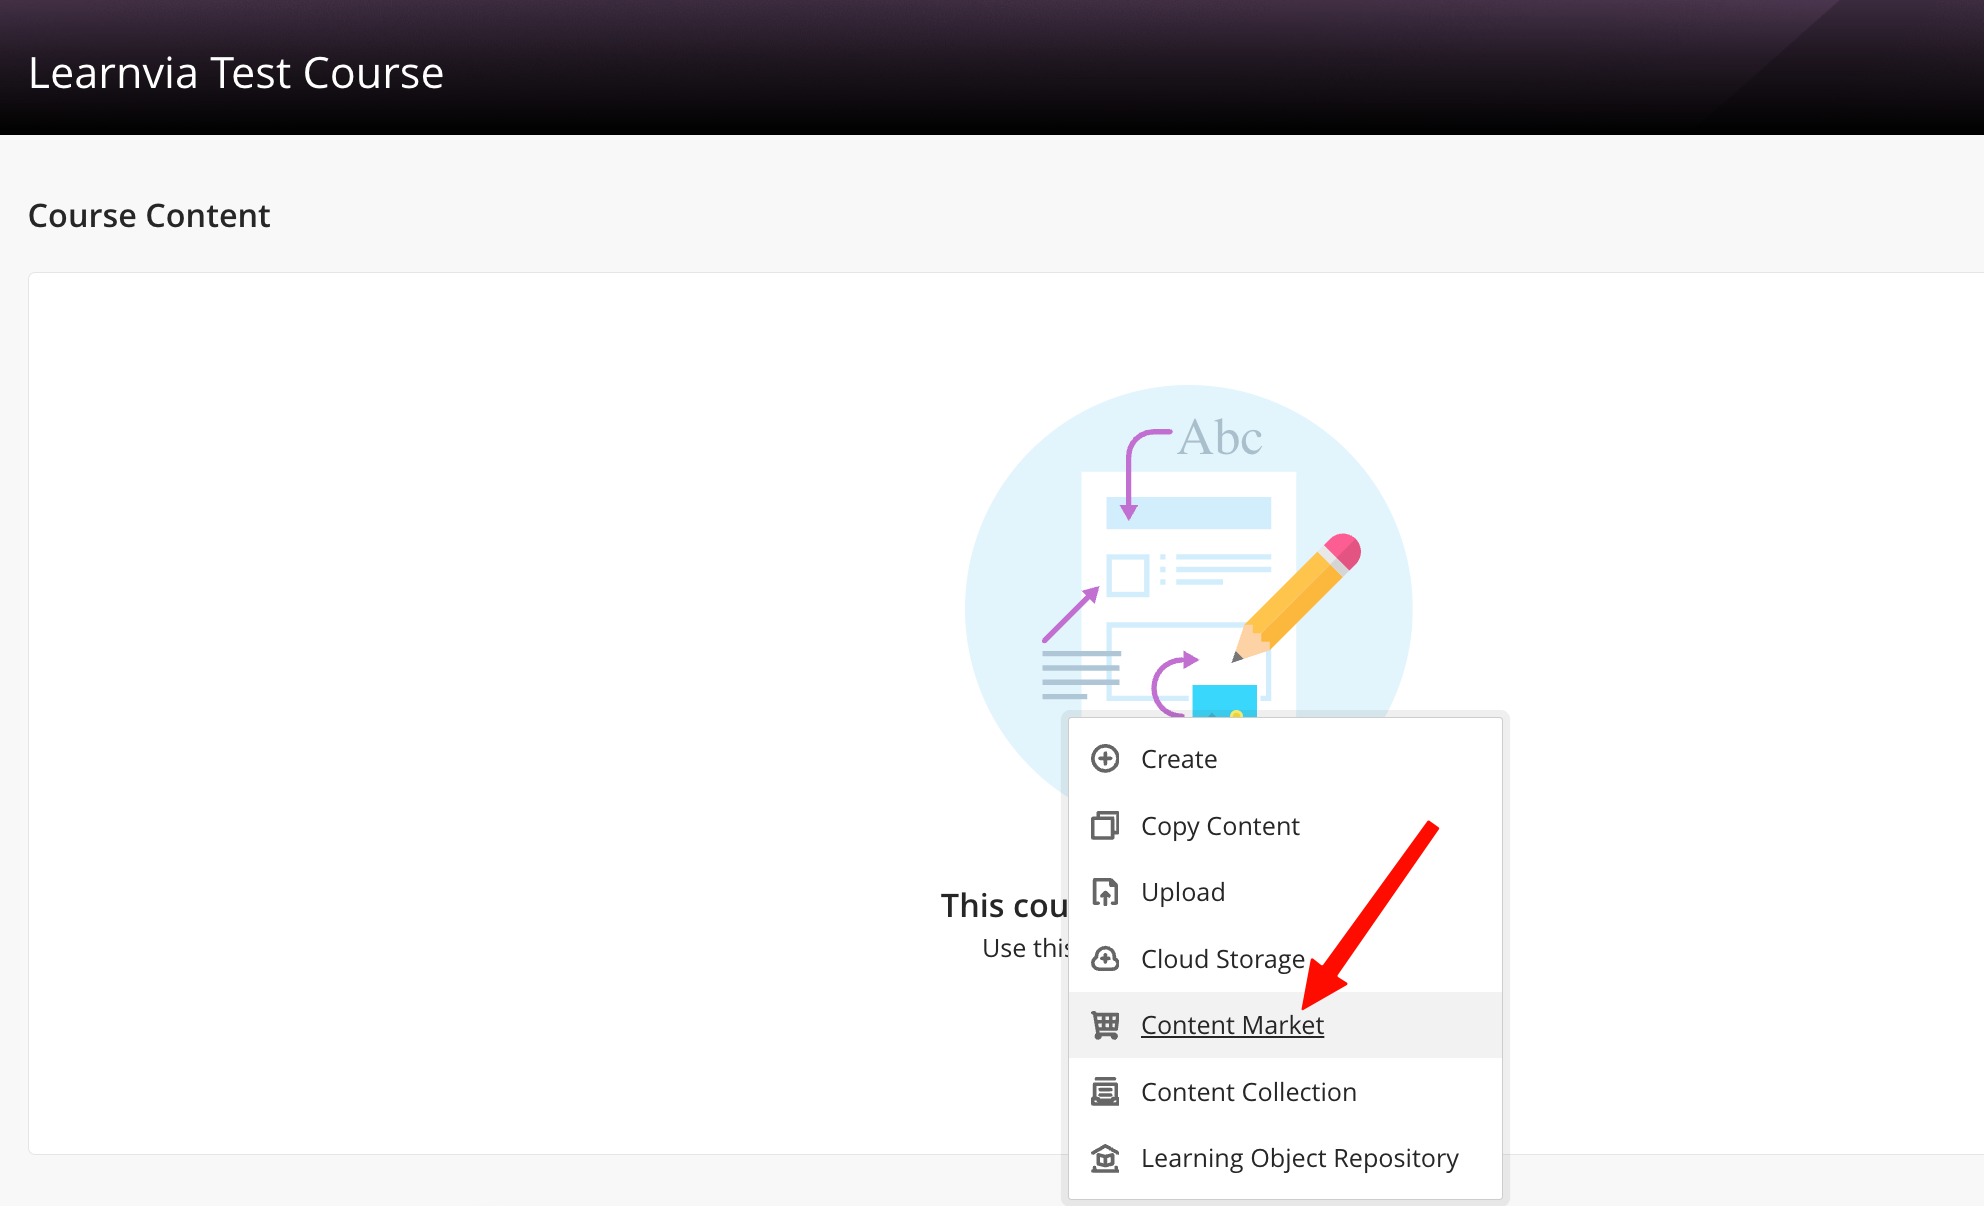
Add Content menu open in the Ultra course; a red arrow points to "Content Market" (menu also lists Create, Copy Content, Upload, Cloud Storage, Content Collection, Learning Object Repository).
Click Content Market from the content picker
Content Market panel showing the "Institution Tools" section with a single "LearnVia" tool tile (rocket icon) to select.

Select Learnvia from the Institution Tools list
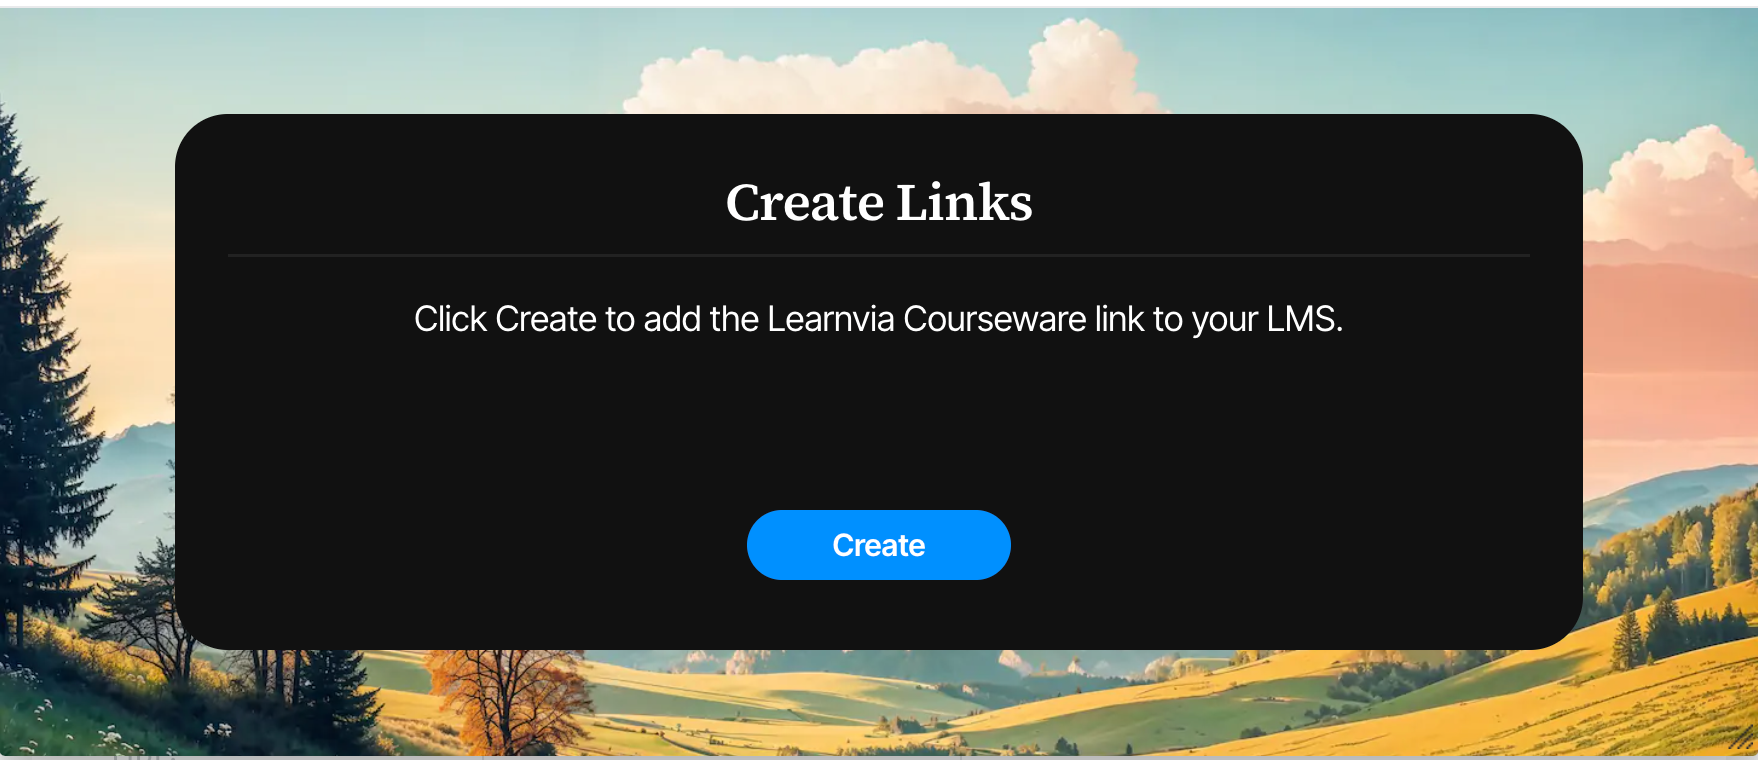

Learnvia "Create Links" deep-linking dialog reading "Click Create to add the Learnvia Courseware link to your LMS," with a blue Create button.


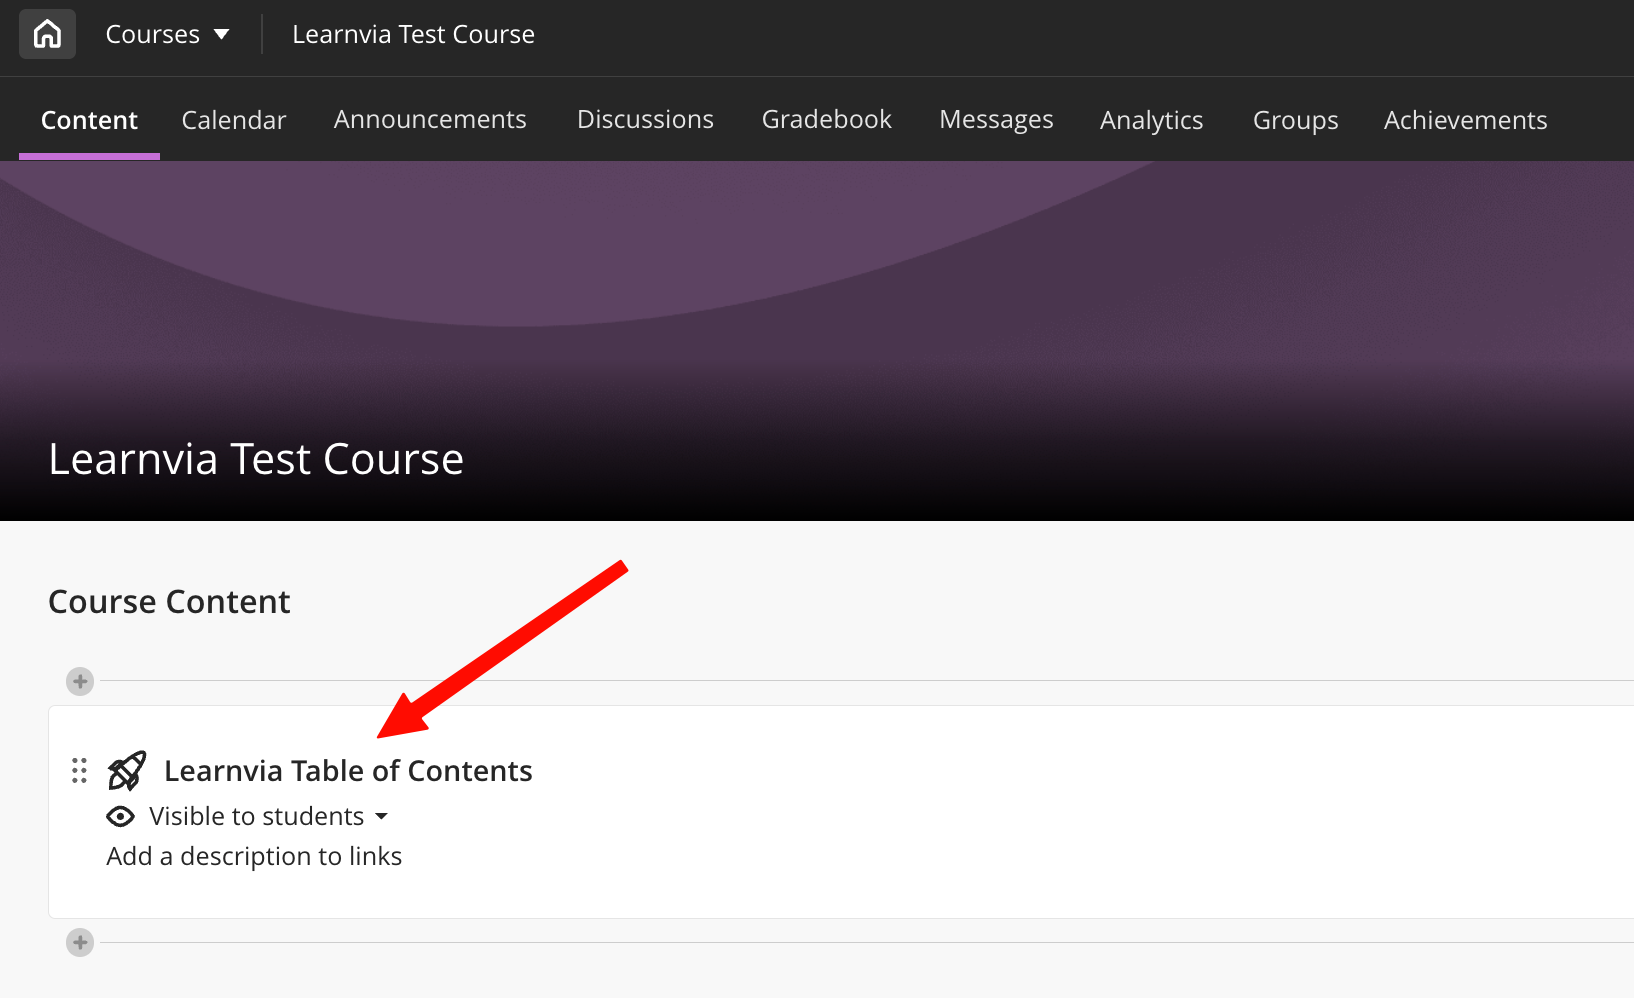
Click Create. Once you see “success”:

  • Close out the window 

  • Close out the market window

  • Refresh the landing page

Ultra course Content page after creation; a red arrow points to the added "Learnvia Table of Contents" link (rocket icon), marked Visible to students.

Instructors and Students can now launch into the Learnvia application using the same course content item.


Was this article helpful?

That’s Great!

Thank you for your feedback

Sorry! We couldn't be helpful

Thank you for your feedback

Let us know how can we improve this article!

Select at least one of the reasons
CAPTCHA verification is required.

Feedback sent

We appreciate your effort and will try to fix the article